U.S.S. Enterprise, Refit Restoration, Part 1

"All I ask is a tall ship
And a star to steer her by"
– John Masefield

The original U.S.S. Enterprise, NCC-1701, designed by Matt Jeffries, first flew across TV screens in 1966 and was redesigned (chiefly by Jeffries, Mike Minor, and Andrew Probert) for Star Trek: The Motion Picture in 1979 (explained in the movie as having undergone a refit).

I like the original design for its simplicity and elegance, but the refit really does it for me with its swept-back warp pylons and overall updated-yet-still-futuristic detailing. It's no wonder I picked this ship for my very first ever model. Check out this gorgeous scene of Scotty giving Admiral Kirk a tour 'round the outside of the Big E in TMP (with beautiful music by Jerry Goldsmith).


Which one did I build?

The Star Trek V AMT/ERTL kit was issued in 1989, but I built it in the winter of 1991 (I remember there was snow on the ground in downtown Toronto, so it may have been early 1992, which means it may have been the Star Trek VI version which came out in '92). Being midway through my second year at the Ontario College of Art, I was a typical poor art student, but I felt I needed to spend a little over $20 (at the Silver Snail on Queen Street) to build (what I mistakenly keep remembering as) my first ever model kit...

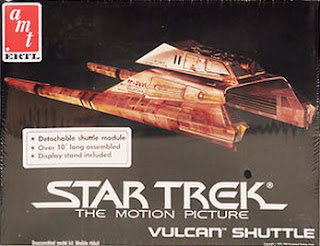
I qualify that memory because while looking for images of correct box art for the Enterprise, I suddenly remembered that I had built a model prior to all of these about a decade earlier! At my dad's work Christmas party in 1980, I received from "Santa" a 1/187 scale model kit (issued by AMT/ERTL that year) of the Vulcan Shuttle Surak which I would have built probably just a few weeks (or months) afterwards. I have no idea what happened to the model, but it was probably lost during my family's move in 1985.

The long-forgotten model.

As a kid, I thought it was a weird design and chalked that up to it being from Vulcan and, therefore, alien and justifiably weird. I hadn't seen the movie yet so I didn't really know what else to make of it. Years later I learned that this was the new design for Starfleet/Federation shuttles and this "Vulcan" version made an appearance because it shuttled Spock to the Enterprise. Over the years I grew to like it, but at the time I think I was a little disappointed that I didn't get the Enterprise or the Klingon cruiser.

Back to the Enterprise...

According to Memory Alpha, the Trek VI kit came with a mini Enterprise-D toy from Galoob, which I vaguely remember (I remember the saucer separated from the main hull), and although I either don't have that tiny ship or I don't remember where it could be, it seems very familiar, making it even more likely that I built the Trek VI issue of this kit. I like that it's the same scale as the Reliant, I never did arrange them as though they were in combat like they were in The Wrath of Khan, but the scales match up, so go for it!

It's very weird: I can remember vividly walking through the snow down Queen to Spadina to pick up some film for class, then getting on a streetcar to catch the subway and head home; I can remember vividly listening to the Grease soundtrack (though, not exclusively) while I built the ship; but other details have slipped my mind (never mind the Surak!)...

NCC-1701-A...for now.

I wrote in detail about my renewed interest in model building here, and I thought I would post a few pics of the Star Trek starships I built from 1992-95 as Part 2, but I got caught up in shooting them from various angles and writing a bit about the designs of the ships and the kits themselves. In a way, my Sci-Fi Project List is sorta my Part 2 as it contains the six spaceships I built during that short period (as well as more recent sci-fi-based projects).

This post isn't simply a Small Pond Shipyard Retro post; it's a prelude to the refit's refit: I intend to refurbish my Enterprise-A model in time for Star Trek's 50th anniversary in September this year. Being only my first second model, my skills weren't developed enough (and they didn't get much better over the next few builds) to do this kit much justice. Like the kits that would follow, I assembled the parts, glued what needed to be glued, applied the decals provided, and did some minor painting. No sophisticated painting, and certainly no lighting. Also, I was lacking any decent photo reference, so accuracy couldn't be achieved. I did whatever the instructions ordered.

Bricks.

I was simply happy that I could put together one of my favourite spaceships and have it look pretty much like it did onscreen, more or less, kinda sorta. I had issues with the warp pylons staying upright from the get-go, and over the years, moving from place to place, they didn't survive intact and broke at the roots. A problem a lot of builders of this ship seem to have.

And what's with that weird texture, anyway?

Bricks!

I felt bad for a long time that my first model, one of my favourite ships, the gorgeous Enterprise, was broken, unable to be displayed anymore. And I had no idea how to repair it back then. But now I've got some ideas. She'll fly again.

Man, that weird texture is everywhere, isn't it?

BRICKS.

AND, the white plastic had turned yellow on almost the entire surface (the decals actually protected the colour as you can see in the negative spaces). AND, the glue had turned orange and gross. AND, the lack of a proper paint job and decals (note the bare, circular docking ports) made this ship look practically naked.

Except for that weird texture. They were obviously going for panel details, but they didn't follow the panel patterns/designs on the studio model, so these just ended up looking like a brick wall conforming to the hull. Maybe if these lines weren't so deep they'd look okay, mixed in with the lines that are supposed to be there. I've recently been watching a series of videos where a builder has been filling in all the "brickwork" on the same kit. I think I'll do the same for my restoration.

Saucer separation.

Testing the joint where the glue has come unstuck, wondering if there would be any benefit to carefully separate the saucer during the restoration. Probably not.

I painted all the areas described in the directions, but there are so many areas where there should be colour. Same with the decals: I used all that were provided, but there should have been more pinstriping or at least decals for the docking ports. I'll be getting new decals for my restoration to make it the actual 1701 refit and not the "re-named ship," 1701-A we first saw at the end of Star Trek IV.

I won't be opening her up for lighting, but I've got loads of great photo reference of the studio model so I can give it a more accurate paint job. I also won't be getting any aftermarket parts, despite their accuracy; apart from the new decals and a new stand, this will remain a box stock build.

Scratch test.

Curious, I scratched a bit of this decal with my fingernail to see how easy it would be to clean up the surface before the "brickwork" gets filled in with Bondo. They're old and brittle (I didn't use anything other than warm water for application, and used no clearcoat afterward), so they should be easy to get rid of.

The paint is fairly thin, and I'll do some light sanding, but a coat of primer should cover things well enough. I hope.

Scale issues.

As a bonus, this kit came with an out-of-scale (way too big!) shuttle Galileo, the redesign of which first appeared in 1989's Star Trek V. I like this redesign as it carries forth a lot of the lines and feel of the original TV version, while hinting at the future of shuttle design seen in Star Trek: The Next Generation.

The model's kinda cute, actually:

Bonus.

And there you have it: over the next few months, my very first model (that I chose myself) will be getting a facelift: sanding, seam & gap filling, puttying, painting, a new stand, and new decals.

I'm refitting the refit.


Comments

Popular posts from this blog

Axel Foley's Chevy Nova (1/25 scale model)

Multiple tributes, here. I remember first seeing  Beverly Hills Cop  on video at my friend Chris K's house, 'cause his family had a VCR and we'd watch tons of movies (and record music videos) together. The summer of 1984 was a special time for us (having created a strong bond in school since Grade 6 a few years before), going on biking adventures around the 'burbs and into the city, etc., and home video played an important role from then until I moved to the opposite end of Scarborough just before we started high school. We liked the movie a lot, both of us fans of Eddie Murphy from his  Saturday Night Live  days. I don't think I'd seen the movie since then (it would have been 1985, probably summer, since the movie came out in late 1984) and I became curious to see if it still held up. It did. It does. I found Murphy as charming as ever and the comedy (and even the action) holds up very well and its very re-watchable and very entertaining.  Beverly Hi

City of Angels

17" x 11", watercolour and digital, 1999 Ah, City of Angels . I thought I was getting cool film noir but got a cheesy musical instead (Google it if you must). Still, it was fun to make the poster and associated images, mostly because the research consisted of watching real films noir and buying a great book on movie posters of the genre. I made tons of sketches and a few digital mock-ups. For the final poster above, I made three separate watercolour paintings (one of the couple and one each of the two black and white heads) and composited them in Photoshop, where I also added the text. In true movie poster fashion, I wanted the actors names to be the top two names, but I lost that battle and had to use the characters' names instead. It looks fine, but it implies that "Kingsley and Stone" are the lead actors in the show. Oh, well...it's only community theatre... By making the "angel" above half black and white and half colour, th

Small Pond Arts Puppet Wagon (1/24 scale model)

I dreamed up the Small Pond Shipyard for my fanciful scratch-built sci-fi airship creations (which still only exist in sketch/Photoshop mock-up form (and boxes in my closet) for now), but more and more ideas kept coming ( this wind turbine , for example, will be part of a rather elaborate diorama I'll be working on this winter). But the Puppet Wagon was a sleeper surprise, to be sure. [Really, though, I don't know why I was so eager to build this right away since I was planning to slowly develop my modelling skills with simpler builds first and the work my way up to more complicated projects.] Not all parts were used/needed. Most of these ideas have come from watching modelling videos online, and when I saw a review of this sweet little Japanese "Ramen Shop" food truck by Aoshima (right-side drive!), my brain started making jokes about customizing it to the weird food truck ideas I'd been posting on Facebook. But the more I thought about what the co